Pages

Friday, December 31, 2010

Happy New Year!!


Well, 2010 is almost gone and with it a lot of moments, some great and some not so great.  This year started out great for me because my DH proposed on Christmas Eve and I was wedding planning.  It took a turn in March when my grandmother was diagnosed with ovarian cancer.  I had the opportunity to spend a week with her in May before she passed away in June.  I could talk about her for pages but I will just say she was a wonderful woman and one after God's heart. 
In July my DH and I got married so that was wonderful!!  I had a friend from church help me make my wedding dress so there were a few stressful moments but who doesn't have a few when they get married?  :)
We purchased a home in the spring and he moved into it in April.  We have been and continue to work on it since it was a foreclosure in disrepair.  We love it!  We have had a lot of fun moments working on the house together as well as with our friends.  The learning curve has been a good one for sure!
Since we have a few things done, I have gotten to unpack a good bit and have room to set up a craft/sewing area.  I have been in the 3rd bedroom but I will be able to spread out a little better downstairs so I will move things tomorrow.  I am excited to have an area I don't have to clean up and put away when people come visit but that day will come in the next few months.
We have celebrated our first Thanksgivig and Christmas as a married couple and splitting time between families and it worked out very well.  We came home today on New Year's Eve so we could be in our home together to start the new year.
So everyone have a blessed and happy new year!!!  Be safe and see you next year!!

LA

Thursday, December 30, 2010

Some completed items . . .

Some friends of mine were given a baby changing pad when they had their little girl early this year.  It was very nice and they used it until she got too long for it.  I have taken it and made it a little longer and the pockets a little wider.  It is pictured below.  I will put a magnetic snap on it when I get home.  You can also tell that I didn't pay attention to my fleece when I put it together and the words are backwards!!  Oh well, another lesson learned!


This is what it looks like rolled up.  The idea is to be able to handle it with one hand and the baby in the other.


I also made a burb cloth for my cousin that had her little boy - Aiden - last week.  I used a flour sack towel because I couldn't find cloth diapers.  I folded the towel in half and seamed around it leaving an opening to turn it inside out and then topstitched around it.  I had gotten some cute blue and brown houndstooth flannel from the remnants bin at Hancock's and I used it as the middle panel.


I used my Cricut to make a card to go with the burb cloth.  I have had so much fun with it already!!  I found some free svg files at Blog of SVGShop including some of the ones I used in the card.


I made a puzzle from a picture of Aiden and put it in the pocket inside the card.  I hope she likes it! 
 
Well, the only project I have left unfinished is our Christmas pajamas!!  Hopefully I will get those made before too much longer.
 
I hope every one has a blessed and Happy New Year!!!
LA

Wednesday, December 29, 2010

WIP Wedneday #3

Well, I think my post this week will look pretty similar to last weeks!  I haven't done a lot of sewing in the last few days.  I did manage to finish almost all of my projects that were started for other people.  I am short on pictures because a friend borrowed my digital camera for a trip and I forget that I can use my phone, but I will try to do better!

Completed Projects:
1.  Fleece hat for my father-in-law.
2.  Cardinal stocking for our friend at church.
3.  Two balaclavas for my  husband and his brother. (I will add a picture shortly.)  I used the material I had left from my husband's vest.

In Progess:
1.  Baby changing pad.  This is the one thing I didn't finish that was intended for someone else for Christmas.  I have most of it done but I didn't get the edge done.
2.  Our Christmas pajamas.  I actually hope to do these in the next couple of days so we will see!
3.  A coffee cozy for my cousin.

Waiting to be started:
1.  A fleece hat (toboggan style) for a friend at church.  He picked the fabric so I am pretty sure he will like it.
2.  A fleece chullo hat for another friend at church.  She didn't pick the fabric, but the before-mentioned friend thought she will like what I picked.
3.  A backpack purse for a friend having twins.  She doesn't like diaper bags so I thought she might like this instead!
4.  Another purse that I have the material for but have not started.
5.  Also, I think I will try to make a lap quilt as my first quilt.  :)  I am sure it will be scrappy!
6.  A camoflage face mask made of netting for my dad.  This will probably be the first thing I finish since my husband and I are still visiting my parents. (Yes, I brought my sewing machine with me!  It has traveled 14 hours this Christmas season!)

Wednesday, December 22, 2010

WIP Wedneday

Well I don't have much time so I will have to make today's post short.  We are packing to go to my husband's parents for Christmas and waiting on the inspector to come and pass our electrical upgrade. 

Completed items:
1.  I have been working on my husband's Christmas present, which is a camoflage vest.  This is the first garment I have made without the assistance of anyone else.  There are places for improvement, but I am very thrilled with it.

2.  Chullo hats for myself and a couple of friends.  You can look at the previous post and see one of them.


3.  Fleece toboggan for our neighbor Mr. Leo.  He is awesome and works nonstop outside with his cattle so I thought it would help keep him warm.


4. An Auburn scarf for a friend of mine.  She graduated from there, so no she is not a recent bandwagon fan.


5.  A second card holder ornament for our preacher and his wife.

In Progess:
1.  A stocking for a friend in South Georgia with cardinals on it.  His late wife loved cardinals and all of us think of her when we see them.  She was one of our prayer warriors and she is greatly missed.  I hope this is a pleasant reminder for him.

2.  A baby changing pad for our best friends.  This is one that is similar to one they have just bigger since their little girl is too long for the other one.

3.  A fleece hat for my father-in-law.  He is a postal carrier and walks a lot of his route so, hopefully it will help keep him warm.

4.  Coffee cozies for a couple of friends.

5.  Our Christmas pajamas.  I am afraid these are not going to get done for this year.  But, hey, I have a jump on next year!!

Not started:
1.  A fleece hat (toboggan style) for a friend at church.  He picked the fabric so I am pretty sure he will like it.

2.  A fleece chullo hat for another friend at church.  She didn't pick the fabric, but the before-mentioned friend thought she will like what I picked.

3.  A backpack purse for a friend having twins.  She doesn't like diaper bags so I thought she might like this instead!

4.  Another purse that I have the material for but have not started.

5.  Also, I think I will try to make a lap quilt as my first quilt.  :)  I am sure it will be scrappy!

This message has been sent using the picture and Video service from Verizon Wireless!

To learn how you can snap pictures and capture videos with your wireless phone visit www.verizonwireless.com/picture.

Note: To play video messages sent to email, Quicktime@ 6.5 or higher is required.

Wednesday, December 15, 2010

Next project after I finish the other card ornaments. A fleece hat for me! :)


Next project after I finish the other card ornaments. A fleece hat for me! :)


Well, I had looked online for a fleece chullo hat pattern and couldn't find one.  So, I started looking for something similar and came up with the Kwik Sew 2356.  The hat I used was view B.  I altered the pattern by tracing it on tissue paper and then shaping it how I wanted it to look!  I got it pretty close I think!!

Monday, December 13, 2010

Ornament Card Holder

Well, I used an idea from Missouri Quilt Co. and turned it into a Christmas Card holder/display.  They have a tutorial for a decorative fabric ornament and I just altered it a bit.  First, I made it larger so that it would be big enough to display cards.  My ornament has a diameter of about 20 inches.
If you look at the tutorial from Missouri Quilt Company, you will see that the front side of the ornament i made by sewing strips of fabric together to make a panel.  I used 3 1/2" by 20" strips to make my block to cut my circle from.


I actually made a circle measuring stick to be able to make larger circles.  I used a 5 gallon paint stir stick because it is a little thicker than a yard stick.  My husband actually did this part - drill a hole in the handle and then measure at specific intervals and drill holes.  I used 2 inch increments.  This allows me to put a nail in the center point and a pencil or marker at whatever measurement I want to draw a circle and actually get a round circle.  :) 

I will put a picture up shortly.  Once I cut the front circle, I cut the back of a solid piece of fabric and then sewed on key rings.  This was originally something to hang on the wall so if you wanted to do that you could put the key rings on the front.


After sewing the key ringson, I put interfacing on the wrong side of the back side of the ornament.  Because I was hanging this ornament and not putting it on the wall, I also put the interfacing on the inside of the front side.


I put a 1/4 " seam around the edge and then turned the ornament right side out which was a little harder because of the interfacing.  You don't have to sew the open edge together because of the topper that will go over it (of course you need to plan for the opening to go at the top of the ornament!)


 I used gold foil wrapping paper, but in the tutorial they used aluminum foil for the topper.  I just wanted it to be gold.  You have to use the fusible webbing with a paper backing to get the topper to do right.  You put the webbing on the foil paper and then draw out and cut out your topper.  Once you get them cut out you peel the paper off and put them together and press.  First it is better to cut out the topper pieces at the same time by folding the paper over.  Second be careful matching them up and make sure you are covering your opening with your topper.  In the tutorial they stitched all the way around the topper but I just stitched across the bottom of it t hold it in place.
I actually used a hole puncher to make the hole for my ribbon to tie it with, but you could cut a hole if you wanted.
 

It was a lot of fun to make and I will be making more for other people.  Hoefully, I will get ours made before Christmas is over!

Wednesday, December 8, 2010

Christmas Stockings

Well, I saw a video tutorial on YouTube by Missouri Star Quit Co. (click on their name to see it.),and I decided to give it a try.  I have never quilted anything so I thought it would be a good first thing to do!

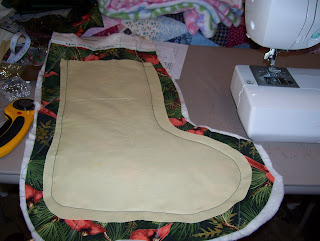
First I used one of my dog stockings to make a paper pattern and then began putting my pieces together to quilt the top of the stocking.


I used my ruler and chalk to mark diagonal lines 2 in apart to follow for quilting the top together.  It was fun to do and made it easier for me since I am not good at a straight line yet!


I used a yellow fabris I had that had a little shine element to it for the back of the stocking.  I like the contrast with the pattern on the front.  Which after I turned the stocking inside out, I realized my birds were sideways!! LOL

Probably the hardest thing about the stocking was the material I used for the cuff - satin.  It was so slippery inside the stocking before I turned it out.  I did learn to pin it in place all the way around and then sew it in.  But all in all I think it turned out well.  :)


I did learn a few things from this project.  First, be careful of thread you are given or that you inherit.  It can dryrot and will cause you tenasion problems.  The first stocking I made, I used some dark green thread that was in my grandmother's sewing box.  She passed away a little ove a year ago and I got her sewing supplies.  She had been in the nursing home for a few years and the thread has been there even longer.  I threw the thread away after about an hour of messing with it trying to figure out what was happening and then calling my mom!
Also, pinning the satin in place with lots of pins! 

WIP Wedneday

This is my first WIP Wednesday post, since I saw it on Freshly Pieced earlier this week. 

Well, I somewhat cheated because I waited until I finished my stocking before I posted so I could have something on my completed list and not just my WIP!!  :)

Completed:
2 stockings for DH and myself (the 2 outside stockings in the pic)

Which, the stockings were my first adventure into quilting anything!  :)


In Progess:
Christmas pajamas

Projects to start:
Ornament wall hanging to hold Christmas cards
Changing pad

Things I have learned:
If you don't use a lot of pins, satin can be not fun!
You have to be careful with thread you are given, because it can dryrot and cause major tension problems with your machine!

Tuesday, December 7, 2010

Older (first on new machine) projects

Well, my first project with my new sewing machine was an apron with some blue gingham fabric I had bought on a trip to Hancock's.  I did use a pattern I had gotten on one the 99 cent sale days and I love it!  My husband is a huge fan of gingham because he (as well as me) is old-fashioned so he loved it as well.  :)

Here is the completed apron: 

 You can also see my new Singer behind it!  I love it!!  :)

I also mended my husband's tool belt which is a heavy suede and made cushions for our dogs' beds out of a vinyl-like material.  I am not sure what it truly is because it is actually golf cart seat material.

So these were my first projects on my new machine from a couple of weeks ago.

Thursday, December 2, 2010

First re-make project

Well, I was inspired by Marisa Lynch on New Dress A Day to remake something.  I got the chance when my husband and I planned a murder mystery dinner party to thank some friends for helping us work on our house.  We chose a western theme - Murder in the Wild West and I was supposed to be the saloon owner - Lily White.  The cost of costumes are too high for me right now so I found a dress at a thrift store  for about $1 and started planning how to remake it.  It was definitely an 80's prom dress!!  Pale pink and lots of lace!!  :) And of course it was not the right size!
Well, the first thing was to remove the underskirt because it was way too long!  I was going to cut off the top and add elastic so it looked more like apetticoat.  The frst thing I discovered was the dress must have been pinned/basted together and then everything sewn at one time with one seam!  When I started rippping the seam, the bodice and skirt came apart so I had to pin it and seam it back together.  The other weird thing, at least it was to me, was the zipper started on the bodice and then went down into the skirt and was sewn to the underskirt!  So it had to be moved to the "outer" skirt also.


The next step was to remove the really big section of lace around the neckline and the bows that went around the bottom of the dress.  I don't recall seeing too many pictures of saloon girls with cute little bows on their dresses.  :)


Once everything was removed, I attempted to die the dress red.  Well, I don't know if I didn't know what I was doing, or it was the material that wasn't receptive to the dye! LOL  After 4 attempts I ended up with a lavender dress and said that's it!  I also tried to dye the underskirt black and it came out a dark purple.  I guess I didn't clean the washing machine enough but it ended up working because it went with the lighter color of the dress.


I made a corset to wear with it next.  Pretty basic but I learned a couple things.  I need to pay more attention to the interfacing I buy and  not trust what the person selling it to me says I need.  Also, it is better to mark the holes for the grommets than do them one at a time!  :)  Because of the interfacing ( it was two-sided and not one-sided so I had to figure out how to apply it raither than follow the pattern.), I had an unfinished bottom edge and decided to use bias tape to finish it.  Well, I didn't like how that looked because the blacks didn't match, so I added fringe to cover it!  In the end, I really liked how it looked with the dress!


The last thing I did to the dress to balance it out, was add black lace around the neckline and the bottom because the dress was so light compared to the corset.

So below is the fnished product!


We had a great time with our friends at our murder mystery dinner party - Murder in the Wild West!!